Tuesday, February 28, 2012

While out walking my jackalope....

(Sigh) I am such a mess. Basically, the family has had a lot going on which has delayed Happy Words from getting some flocked shoe outfit photos. We're all getting over some bugs, Eric (the hubby) has been studying for his Master Sargent placement test, the weather has been bad, and we were temporarily distracted by Legos. So when we finally had a sunny day I knew I had to catch up and cram a few shots in before I was once again preoccupied with life stuff. I had a quick plan, figuring we’d take the kids to the park, where there’s a big bathroom I could change in (getting a few outfits in all at once), I’d pack a picnic, walk the trails, and we’d all have a nice time.
I remembered to hastily grab all the “important stuff” like a ball for the boys, the camera, flocky shoes, the dog, some lunch, and my tights. I had not planned out any outfit accessories though. Standing in my bedroom with a tote in hand and the kids shrieking out their pre-park excitement, I figured I’d just grab a bunch of gold and brown stuff and sort out exactly what I wanted to wear once there. (What a bad idea!)
Now I guess it was the rushing out the door that threw me … because I KNOW how I am when dressing up. When I pack for trips, I make sure I have lots of options. I personally have to see it all on, in front of the mirror, and by the time I am done mixing and matching, trying out every bracelet and necklace, it looks like a tornado has ripped through my room. By using this tried and true method I don’t end up all matchy! If I had stood in front of a mirror wearing all of this, I would have said…  I need my orange bangle and hobo bag. Yah…. it would have been much more fun that way and broken up all that….. brown. (And been more true to me.) Actually I did say all that standing in front of a mirror, but the mirror in that cold park bathroom was kinda far from my closet. I also might have tried on a few other tights, it’s not like I have any shortage of those…. green, yellow, anything! But instead I got out there, realized my gold belt was too big, (Hence why it is backwards in that one picture. Three cheers for weight loss!) and that none of the accessories I grabbed actually worked together. I guess I just reeeeeeally wanted to show off my FAVORITE vintage bag so I could tell you all how I fought dirty for it at an auction and WON! (Doesn’t matter that it doesn’t work with the hat!)  Anyway, I almost scrapped all of these photos, because it’s not exactly how I would have worn it out, if I had gotten dressed in my house, and not in a public park bathroom. It’s almost me, but not quite me. But you know what is soooooo me? Messing up and learning lessons about getting dressed in the woods.
So here we are. You know where..... playing dress up in a public park bathroom. It's really the best place for styling and fashion reflection. It’s where you wonder, why I didn’t grab that other clutch. It’s where you promise yourself, that the next time you do an outfit post you’ll actually wear it to the photo location, even if it means you only get to take pictures of one outfit. (Wonder if I could teach my three year old fashion photography?) And it’s when, after your five year old shouts from a crowded playground “HEY MOM! Are you going to change your UNDERWEAR too!?” you decide you might need a better way to wrangle the children during these experiences. Perhaps the best way to deal is to send them to school, and kidnap one of my girlfriends to play dress up in the woods with me instead! No worries. I’ll figure it out. Until then, look at my amazing vintage purse!
(And check out those Jackalope earrings that Eric got me for Valentines! The Etsy shop they came from, Fable and Fury, is full of many potential gifts he should think about getting me!)
At least messing up is still fun! -Kendra

(A better picture of the jackalope earrings from the Fable and Fury store.)


Monday, February 27, 2012

Jackalope Love! (And a few tips on flocking with glitter.)

Here are my flocked Jackalope shoes! They are so cute and I am just crazy about them!
I'll keep this short folks, as I have already talked flock in my Bat Heels post. I will just feature a few tips for flocking with glitter which I had left out eailer. 


         *Another thing I've found is that pressing down the flocking into the glue helped me keep the coverage even.

              I will also say that I've noticed a real variety in the quality of  flocking I've collected. On my Bat shoes I used Martha Stewart's flock, which was loose, very fine, and had no clumps. For these jackalopes, I tried out the Micheal's brand, which was full of clumps and very coarse, I was unable to smooth it out. This quality issue lead to my Jack looking a bit lumpy. I've just recently practiced another flocking project, this time on paper,  using plain old Elmer's glue, and Martha's flocking again, and it turned out great. I will stick with Martha's in the future.
            
             Later I will post the outfit I wore with my sparkly Jackalope shoes. I do really hate posing for photos, you'd think a girl who has seen every episode of Top Model could do something in front of a camera but nope.... I am hopeless. I like to dress up though, so I will keep at it.

Keep it sparkly! - Kendra


Holy Flock Batman! (Glitter and flocking are a dynamic duo!)

I know it might be hard to see but these hot shoes sport grappling hooks and Bat-Tasers. They also do double Batarang duty!  Don’t worry though, these heels are for good and justice, and will promise not to use their powers for evil.
Now if I am going to talk nerdy to you, I’d admit that I really am a die-hard Marvel girl, but when introducing the toddler set to superheroes I have found Adam West Batman and vintage Superman are the way to go. So classic Batman Blue and Superman Scarlet are the current team colors we sport in this household.
      I scored these brand new heels from Goodwill for a measly four bucks. Glittering on a Bat Signal seemed like the right thing to do. While digging through my sparkly stash however, I came across a jar of forgotten and unused yellow Martha Stewart flocking. It was so very yellow…. sooooo very bat signal yellow. The fuzziness hypnotized me, brainwashing me into believing flocked shoes were the most genius idea in the Whole Wide World!! Now I cannot say that putting fuzz all over a pair of shoes is really a great idea, (think rain and mud- these shoes are for sunny days only), and I won’t say it was the smoothest project I have ever tackled, but I will say they turned out pretty awesome. 
If you’ve never worked with flocking before it is pretty much tiny fuzzy fibers you might have seen used as texture on greeting cards, or maybe covering vintage bunny rabbit piggy banks. You can work with it pretty much the same way as glitter, but it requires a little more time, and thus patience to get it right. You’ll need to do more layers for full coverage, and it is by far messier than glitter. I discovered if you use fabric glue you’ll  end up with yellow concrete instead of yellow fuzz. Mod Podge again comes out as my medium of choice.
-If you’d like to try some flocking, I’ll break down how I crafted these for you.  (To the Bat Cave!)
1.      Sort out a pattern, I free handed my Bat-Signal, but you could grab clip art online. Make sure to try different sizes so you can see that works best.
2.      I taped down my colored blueprint so I could visualize the finished product.
3.      Trace the outline with a Sharpie. (Gather up your sidekicks…. I used Martha Stewart glitter and flock.)
4.      Then cut out any details and finish the outline.
5.      Let the flocking begin! Just build up layers of Podge and light flock, allow to dry and repeat until you’re happy with the look. (I did think that perhaps next time I may paint the base to match the flock color that way I might not need as many layers, but I couldn’t guarantee the flock would stick so skipped it.)
6.      Tidy up. I was able to push and scrape off wayward glued flock with some tool-thingie I found in the garage. Please no one chop off a finger doing battle with your flocking.
7.      Once flock is dry glitter as normal.
8.      You’re super fabulous. Enjoy.
Dress-  S.Oliver (Thrifted)
         Shoes- Goodwill
Photography done in harsh light- Husband (We'll work on improving that.)

            After finishing my Bat-Heels, I realized that flock might be better suited for portraying a naturally fuzzy, perhaps woodland creature, than a crime fighter, so I made a Jackalope pair as well. Stayed tuned for that!
           
           Same Bat-place! -Kendra

Friday, February 24, 2012

Some fun with Sharpies.


My mother found this little tin pail at Goodwill for a dollar. Check out what a perfect blank canvas it is! We could have turned it into a personalized lunch box, or maybe a spy kit. If I had a little girl I might have made it into the glittery jewelry box of my.... I mean her.... dreams.
When I asked Baelin what he thought I should do with it he suggested I draw a cat.
"Lots of cats."
 I suggested that he draw the  cats instead. 
"I don't know how."
Well that doesn't seem like a very superhero thing to say. We thought it might be a good idea to practice drawing a few until "Super Green Man" acquired the power to depict such creatures. I found a thrifted art book which featured our desired subject, sharpened some pencils, and we created a kitty army. (Both B and I were much impressed by his cat creating talents. It seems you can do anything if you're wearing a cape!) While he continued with the paper and pencils, I pulled out my Sharpies and started to prep the tin with a colorful frame. I love my kids doodles, and thought this might be a great way to showcase them.  Each boy got to decorate one side of the tin, I drew rainbow polka dots on the sides, and we all had nice afternoon working on it together and chatting about our creation. Romyn decided to go abstract, with a "Train, machine, sorta thing" he titled "Art Piece." Baelin stuck with cats, drawing a sleeping cat with wet whiskers. His cat is portrayed shooting radio signal "meows" from one of his three stomachs which only other cats can hear.
Excellent.
Deciding we could not keep such an amazing treasure to ourselves, we re gifted it back to my mother. Really though, it is a great idea for a grandparent gift. It's functional kid art! If you had a painted white box or plain tin from an art and craft store, or something that you were lucky enough to have thrifted, letting your little ones go Sharpie crazy is a great way to make a unique gift. Mother's day seems right around the corner doesn't it?
If you're hesitant about handing over permanent markers to toddlers, you could always let them use colored pencils, then trace over their handiwork with the Sharpies.
There you have it. Fun with Sharpies, and the only art project we've done all month that hasn't required massive clean up. (Which is a nice change!)
Have an awsome day everybody!
-Kendra

Thursday, February 23, 2012

Fun with clay.

As I mentioned in my "little bird" post I had some fun with clay this month. I only planned on making a little bowl, but as I was  tempted by the possibilities of clay, I couldn't just stop there. For my friend Julia I made the little owl above. He sits on a wire and now lives happily in a sunny potted plant in her home. I made him the same way I did the little bird ornament, with air dry artist clay and acrylic paint.
Next I made a few mushrooms. Everybody loves a happy red mushroom right? Those small ones were made into magnets which I later sent out as gifts. (The two big ones I have greedily kept for myself.)
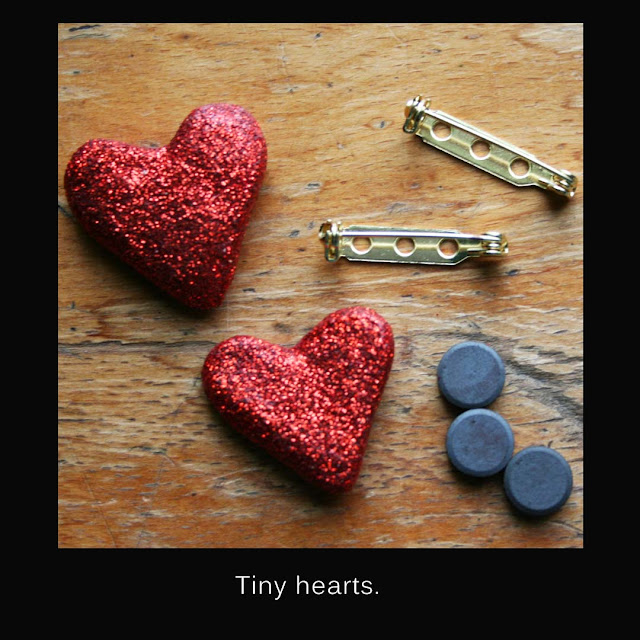
Last I made a few tiny glittery hearts. A few were made into magnets and a few are now pins.
 I cracked all these trinkets out during one long lazy afternoon in front of the TV. I really love playing around with clay, it's creatively satisfying and  you can get a lot of bang for your buck. (And I get to share my little creations with friends.) Can't think of anything to sculpt? There is no shortage of inspiration on Pinterest, just stay focused in that sea of creative insanity, or you may spend all day there instead of with your clay!
Happy Crafting everyone!
-Kendra

Wednesday, February 22, 2012

Sparkle shoes... not just for girls. (At least we don't think so.)


            See these shoes? These are not just any old shoes. These are ROCK STAR shoes! Back in the fall of 2010 our family was not quite through the middle of a rough, year long, deployment. Daddy’s visit to Afghanistan was hard on us, and especially hard on his little boys. Finding ways to keep everyone happy and sane sometimes felt like an uphill battle. The TV was the quickest way to keep the boys happy, and thus me sane, so there were plenty of days I took full advantage of that. Before I knew it my oldest, Romyn, was reciting every commercial, demanding I buy Swiffer’s, asking if his cereal contained enough whole grain, and shrieking from the playroom whenever a product popped up that he wanted.

"COME AND SEEEEEEE THIS ONE MOM!"
 (Groan.) The commercial that I was expected to rush in and enjoy with him most often was for Sketchers Twinkle Toes. Yah, those girlie shoes. Now I am not the type of parent to enforce gender rules. As the mother of two boys who happens to love glitter and nail polish I am happy to oblige requests for painted nails (monster nails) and Tinker Bell underwear. (They didn’t have Peter Pan ones!) Even today my youngest, Baelin, stomps around in a pair of pink kitty boots. (This kid loves cats, and I am hard pressed to find one that isn’t purple or pink. Luckily he doesn’t care and looks awfully cute dressed as Superman in pink boots.) I’ll admit that once I did snap at Romyn that a purple, fur trimmed, coat he asked for at Hanna Anderson was a girl’s coat. What I had really meant to say was, I will not buy you that 200$ coat just because you like the fur. But like some parents I do get tired of explaining myself all the time. The point is, I am cool with my purple kitty helmet wearing, yellow toe nailed boys. But I really wasn’t sure what Romyn saw in these shoes. He is in no way a fan of either pink or purple. Finally I asked.
“Romyn, did you mean for me to see the commercial on before this one? For the blinky policeman shoes?”
“No. Those, the twinkle toes!”
“Really? Those pink ones right there?”
“I want them! I loooooove them!”
“Why do you love them?”
“Because they are sparkly.”
“Well the blue and black ones sparkle too, when you run they light up.”
“No! You can only see those in the dark. These always sparkle.”
He had a point. I rewind the ad to take another look.
“Alright, but you see the colors these tinkle shoes come in, they are not in any colors you like. They are not in colors many boys like. They are meant to be girl shoes.”
“I like pink.”
“Really? You’ve told me feverishly you only like gold and black.”
“I like pink, I want Twwwwwinkle toes.”
“Romyn it’s OK that you want them, but they are expensive and I hate to buy you a pair of pink girl shoes that you’ll later decide you don’t really like. They just don’t make sparkly shoes like that for boys.”
“Why not?!"
Again, my exhaustion has caused me to say something I sort of regretted. If I had just said we couldn't afford them this conversation would have been over! I really don't care if he wears pink princess shoes. But the fact is, they are girl shoes, society says they are girl’s shoes, and sketchers says that they are girl shoes. (Even if he had lived a completely gender neutral life I’d like to think he is smart enough to deduce this from the sparkly pink, female filled commercial graphics.) I tell him all of this and that if I really thought he would enjoy them and wear them I would be happy to buy him pink Twinkle Toes. I would be proud of him for embracing something he loves. (I also point out that some folks might think it is funny he'd wear shoes marketed toward girls, and how he could respond to that. Honestly this Sketchers commercial was the current bane of my existence.)  I ended with something like, I know you Romyn, and you won’t love pink shoes. I am not going to be buying them for you. He ended up terribly sad. Dang. Well, why don’t they make boy’s glitter shoes? Maybe they did. I suggested that we scour the Internet for gold or black sparkly pairs. In the process Romyn describes just what he thinks would make the perfect set and it doesn’t really sound like Twinkle Toes at all.
Now at this point in time I had not seen any DIY glitter shoes on line, otherwise I would have done a better job with this first pair for the boys. It just seemed logical after looking at hundreds of sparkly ones with Romyn that we just throw some Elmer’s on a pair of Vans and roll with it. Finding a cheap white canvas pair was tricky. Vans and Keds are pricey, especially when you are buying two pairs and then trashing them with glitter.  (Really I should have realized I could have used any color, then I might have found a clearance pair, but I was stuck on white.) Finally I found some slip-ons at Wal-Mart for 5$. I ordered a pair for both boys and we set to making some Rock Star Sparkle shoes! Romyn was able to make his dream kicks, with lots of gold, his name, and tiny race car patches. (Those were eventually lost.) Romyn got just what he wanted, and was even happier with them because he had created them himself.  Having a project that made him feel special during Daddy’s absence made the days a little easier. We called them their Rock Star shoes. Baelin out grew his goopy green pair first, and Romyn his soon after, and by then it was all about the Crocs, so we never made any others.
I came across Romyn’s shoes in the closet last month.
“Romyn look at these! Do you remember these?”
“My rock out shoes!”
“They won’t fit you now, I think we should pass them on to B and let him make them over.”
“Wha…. Nooooo!”
“Ro. They don’t fit you. I will take a picture of them so we can always remember how awesome they are.”
(Grumble…Grumble.) “Fine.”
Baelin’s beyond excited by this, probably because he heard his brother really didn’t want him to touch them. Or maybe he had been dreaming of a new glittery pair. I was surprised he didn’t want to cover all the gold with green, his favorite color, and instead opted to add more. Pikachu helped him out, whispering in his ear when he needed more Mod Podge or black glitter to cover Romyn’s name. (Mod Podge this time around, not Elmer’s.)  B was actually home sick for this project, so perhaps Pikachu’s assistance should have worried me. Well, both Pokémon and Baelin are very happy with these sparkly sneakers, and I am happy they are getting a second life. He gets loads of compliments when we go out, and is glad to tell folks that he made them himself and they are super fast. When he puts them on he always says “This way everyone will see me coming!”
These are not girl shoes or boy shoes. These are sparkly Baelin shoes, and yes, they are a mess, which is well suited for a Rock Star!
        Rock on! -Kendra

Tuesday, February 21, 2012

A little bird....


            One of my best friends, Christie, just celebrated her first wedding anniversary. I have been so excited to find her the perfect gift. Of course, in my mind the perfect gift is something I get to paint and glitter. (Maybe including a gift card if I have a crafting fail.) Originally I just planned on making a little personalized bowl for her dresser. I was really inspired by this one at Curbly, and here’s how mine turned out.


          I used stamps for the couple’s initials and I think it's pretty nice. It did look a little lonely in it's gift box though. Then I remembered that Chris told me she was sad no one had  gifted her a “First Christmas” ornament. I said that I thought a Christmas ornament was something the couple normally purchased for themselves. Unfortunately by the time she realized this it was slim pickings and she couldn’t find one she liked. I thought of making a first Christmas ornament, but wondered if it lost it’s magic if it didn’t hang on one’s first Christmas tree. I figured the next best thing would be a First Anniversary ornament!  This little blue bird was inspired by Christie’s wedding invitations which featured little blue birds and tiny glitter hearts. (I remember, because I made them!) This guy turned out so cute I think I am going to have to make another for myself. Mine may just sit on a wire so I can stick him in a potted plant. Maybe one could be an ornament for an Easter tree? He might like hanging out under a bird house. I am not sure yet, I just know I want a little bird.    

 It’s very easy if you would like one too. I used artist air dry modeling clay that I picked up from Michael’s. (You could also use the Crayola stuff.) I molded the shape of a bird and then pushed the folded wire through. Make sure you twist the loop at the top of the wire first and hold the “legs” together as you guide them through the body.  Pull the new legs apart a bit once you’ve got them in your figure, you can touch up any damage you’ve done with a bit more clay. Then I used pliers to shape the bird's feet.  I knew that my bird was going to hold a banner, so I made the feet little loops that I could pinch closed once I had the banner in place. Do all this fiddling before you let your sculpture dry overnight. You don’t want to put any stress on the figure and crack it!  I decorated the bird with acrylic paint, a black paint pen for details, and a sparkly glitter heart.  It’s sealed up with glossy Mod Podge. All you need for the banner is a scrap of paper bag you’ve painted on both sides, more paint pen and seal it again with Podge. Ta-Da! I hope that it finds a happy home on their Christmas tree for years to come!

Since I had the clay out already, I made a few other goodies that I will post shortly. Thanks for stopping by!
-Kendra

Wednesday, February 8, 2012

Valentines + vellum = cute!

       
            I am so far behind on Valentine projects this year. Between the boys and I this house has been sick for almost three weeks and it has been far from fun. Yesterday Romyn was home sick from school and I thought it would be nice for us to camp out in front of the TV and get caught up on some Valentine cards. I love children’s valentine packs, especially the sort that comes in perforated sheets! Unfortunately those do not come with envelopes for mailing. Last year I solved that problem with cute little store bought envelopes and sent over 40 cards out to friends and family. This year.... I realized I was out of little envelopes and the thought of stuffing my little valentines into legal envelopes bummed me out. Not at all in the mood to drag sick boys out to hunt for envelopes I went digging through my old scrapbook supplies and came across some vellum. EXCITEMENT! The thought of my little valentines peeking out of colorful mailers during their journey made me very happy. So the boys and I set to work. I did not bother with a pattern, because I have so many different shaped cards, I just folded them over and taped them up with pretty paper tape. (You can find some here at Happy Tape.) We even stuffed a few with confetti and used sticker labels for the addresses. (Make sure you don’t make your envelopes so small that they’ll get lost at the post office.) Romyn had so much fun with this project that he decided to make tiny cards for his favorite Pokémon. (Cute!) Baelin insisted that all his envelopes be green, which is his very favorite color. (That’s his cute face in the pictures today; Romyn informed me he was too “sick” to pose.) Eh… speaking of sick I wonder if I shouldn’t have stuck little heart shaped hazmat warnings on these cards? “The CDC recommends washing your hands after enjoying this token of affection.” (Apologies loved ones!)
     *Off topic- in some spare moments I have been surfing the Internet for Photoshop tips and demos. (I could use a lot of help!)  I’ve made magic with these photos and this demo from Pugly Pixel. Katrina’s blog has been a lot of help and I have a feeling I am going to have to buy her a coffee. (Thank you Pugly Pixel!)
Best wishes everyone! -Kendra

Monday, February 6, 2012

Little doomed glitter boots....


At this point I have glittered messes of shoes. I feel like I am sort of an expert. I've glittered canvas shoes, satin shoes, plastic shoes, and even suede shoes with great success. But I made a mistake with these boots and I am a little ashamed to admit it. (I’m worried someone might swoop in and steal away my "sparkle queen" badge.)

After seeing this Color Blocked Shoe D.I.Y. on A Beautiful Mess I was dying to find some boots to make over. Originally when I grabbed these up at Goodwill I thought to paint them silver with black scallop details….. but I then had an attack of the glitters. It's usually not a good thing when I change my mind mid project. It usually means I will miss something...... like that these shoes are leather.....   annnnnnd I probably am going to need to prep them in some way to ensure the glitter sticks. I thought briefly about sanding them, but I already had a paint brush loaded with mod podge in hand, and mod podge had never let me down before! NEVER! Upon finishing my last coat of glitter however, I could tell that I was at least going to have some problems with crackling. (They are more pliable than any other heel I had be-sparkled before, and there were cracks right away.) I decided it would be smart to keep a bag of the custom glitter mix handy for touch ups. Also that it would be wise to wear them on a short outing just to test their resilience. So boots and I headed to Baelin’s preschool birthday party... boots were a huge hit among the 3 year old girl set...and they made it out of the preschool madness in one piece. I now have false hope that they will make it through a Tool concert. My shoes are DOOMED!


So here we are, boots and I, moments before we go to rock out at Tool. (Mental note made to power wash the patio come spring.) I am looking a bit more "momish" then I would like, but as some moms do I am sort of living in that sweater dress at the moment. (Which was a steal from TJMax.) If only I knew then that my boots would not be able to handle all the amazingness a Tool concert can offer.
           Here they are after...
        
       I’ve learnt that I stomp my feet during concerts like I am at some high school football game. There are so many chips... and loads of sad cracks. Not really something I can just to touch up as I expect these boots would continue to break my heart even if I did. Maybe they are just sad that I didn't paint them silver. Their little hearts must have been set on black scalloped details. (Fine then boots, we’ll do it your way.)  Back they go into my project pile and after I have peeled off all the glitter I will paint them. It does hurt a little bit to see all that glitter go to waste.  (Sigh, lesson learned.) I'll post their makeover when I have finished, and I am sure that the boots are happy with their new look.
     Does anyone else have any other tales of sad D.I.Y. disappointments? Sometimes I just work too fast for my own good.
Until next time. - Kendra

Saturday, February 4, 2012

My fridge says "Welcome".


The first time I visit a new home I love to check out the fridge. I feel like you can tell a lot about a family by what they’ve got displayed on their refrigerator doors.  Are my new friends freakishly organized with meal plans and agendas proudly showcased? Or maybe they are social butterflies, with lots of invites and photos on exhibit?  I have friends whose fridges are covered with inches of paper and those who prefer a quite nude icebox. Personally, before I had the boys, every inch of my refrigerator was covered with my massive magnet collection. Perhaps it was happy memories of my grandmother’s kitchen and my adoration of  her vintage state and cute googly eyed butterfly magnets which inspired me to start collecting. Possibly a little of that, and possibly that I figured a great way to decorate military housing (in which you can’t paint) was to have a rainbow mosaic of awesomeness in my kitchen. Actually my original collection wasn’t confined only to the fridge, our amazing apartment in Germany had metal doors, and my magnets were allowed to roam freely about our home. With so much space for magnets I was even inspired to customize my own. Any time I spied those large magnetic calendars I’d grab extras so that I could slap on some Hot Topic stickers. (Just cut around the sticker and TA-DA, you have a new Invader Zim magnet!)
 Unfortunately for my collection, once baby Romyn came along all the tasty, bite sized magnets had to go. Soon after all those he could reach were hidden away too. (The daily "pick up a million magnets" game wasn't very fun for Mommy.) Quickly all that was left of my once proud collection was what fit on the freezer door. (I actually couldn’t get rid of all those magnets so I kept the extras in two happy meal boxes on top of my fridge and just swapped them around as it suited me.) Now that my boys are older, Romyn is five and Baelin has just turned four, eating magnets isn’t really something that worries me. It ends up though, that most of my magnets are still in a happy meal box atop of the fridge. (And on my washer and dryer because I've got a lot of magnets.) Many still grace the top half of the fridge, but the bottom half has been pirated away by the boys. It’s loaded with drawings of ninjas, sticker collages and photos from our last Disney trip.  I guess that I am alright with sharing, after all it still has the same rainbow mosaic feel I loved about it so many years ago. When visitors come to my house the fridge is definitely a conversation starter and I really like it that way. I hope it shouts that the family who lives here is fun, creative and happy. (And maybe not too unorganized.)
Today I thought you might enjoy a little peek at my freezer door! I have a lot of family photos, some magnets made out of vintage bingo pieces, tiny works of art from Romyn, and a Disney post card from my parents up there. It all really suits us. Is there one thing you always have on your refrigerator? (I think I always have a little of everything!)
  Until next time! - Kendra

Thursday, February 2, 2012

I love sugar cookies on Valentine’s Day…. and every other day too!


This tasty little cookie isn’t lying. He truly is the yummiest! He’s also so happy it’s finally February and I have an excuse to bake loads of friends for him.  And really I need to take advantage of every possible excuse to justify the mountains of cookie cutters and masses of sprinkles I continue to collect. Now you all should know that you’re very, very special. This sour cream sugar cookie recipe has been a closely guarded family secret ever since we acquired it from Mrs. Murphy at a cookie exchange 17 years ago. We knew a good thing when we tasted it, and smartly hoarded all the amazing cookie magic to ourselves.  Actually, I didn’t even realize how precious this cookie was until I unwisely passed it on to a friend and my mother almost disowned me.
“You give her the recipe you give her the POWER! Now she will never need YOU for cookies!”
We’ve since learned how to share and over the past two years we’ve managed to pass it on without too much separation anxiety. (Apologies for keeping recipe all to yourself is best expressed with laminated recipe, cutters, baking sheets and sprinkles delivered during bridal showers.)  Yes, I know there is no shortage of sour cream sugar cookie recipes online, but only because I peeked yesterday.  I’ve never needed any of those other recipes! I have this one and well…. It’s perfect…. It’s all powerful! It’s the yummiest. You should make them for valentines and I will tell you how.
                Now like my cookie friend up there, I will be honest with you. (Can I call him a friend after I have chewed on him?)  I am by no means amazing in the kitchen. This is OK with me, I sort of feel like my mastery of rice crispy treats and sugar cookies more than makes up for any other shortcomings I might have. And while I am being honest I am going to tell you it took me a while to perfect these treats. I botched my first few batches, perhaps because on some level I would rather have my mother continue to do all the work and bake them for me forever. I learned this wasn’t a great strategy after my father retired from the Air Force and whisked my mother stateside. As a newlywed in Germany I looked at my sad, burnt and dry cookies and realized mom was not going to hop on a plane any time I got a hankering for this yumminess. (Which is on every holiday, including talk like a pirate day, and national yoyo day.) So I set to work, and discovered if I tripled the recipe I would get perfect cookies every time. (Three really is a magic number!) I made this realization just before I realized I could eat my weight in sugar cookies…. and then some. Folks, let’s not kid ourselves, these cookies will make you fat. Eating them with your girlfriends, or just before you work out isn’t going to save you. So make sure to use them for good, pass them around, take them to sexy firefighters, send them into work, because it’s valentines after all and people love a sugar cookie.  In my case eventually a cookie fairy god mother gifted me with a magical kitchen aid mixer which guarantees my sugar cookies will always be perfect. So even if you’re slightly incompetent in the kitchen like I am stick with it… it’ll be worth it.
              So what makes these cookies my absolute favorite? (Besides the cute shapes and tasty frosting and sparkly sprinkles?) These cookies are not crunchy. I hate crunchy sugar cookies. The only thing I want to crunch on my cookie is the sprinkles. I guess if you rolled them out really thin they could be crunchy, but WHY would you want to do that when you could have a fluffy, teacake-ish cookie which is a perfect partner to a cuppa coffee and some trashy TV? Be nice to these cookies and do not roll them too thin.  Do you think you might like to try them?
Here is what you’re going to need…..
2 cups of sugar
1 ¼ cup of softened butter (BUTTER I say!)
3 eggs
2 tsp. vanilla
1 cup sour cream (Not low fat!)
1 tsp. both baking powder and baking soda
½ tsp. salt
6-ish cups of flour.       (Ohhhh… crud. I know it. I did the “ish” thing. I did tell you that I am no good in the kitchen.  Usually only add six, unless the dough seems extremely sticky, then you might add a little more. If my dough is a little sticky, I’ll be sure to add more flour as I am rolling it out the next day. You could also try playing a little music to lighten the dough’s mood. I get to go see Tool this weekend, so my future cookies and I rocked out to Lateralus.)
The first thing you’re going to do is cream together the sugar, butter, and eggs. Then add the vanilla and sour cream and mix well. Separately combine the flour, baking powder, soda, and salt  then slowly add to your wet mixture. Now is a good time to check if your dough needs a bit more flour, it is alright if the dough sticks to your finger, but it shouldn’t feel wet. While you’ve got your hands in there, as my friend Kati would say, it’s a good time to check your dough for poison.  If it’s yummy you can assume you’re probably safe.  Now chill that dough for at least two hours, but its better left in the fridge overnight. As long as it is wrapped up airtight you can probably leave it for two days. I cannot speak the longest you could refrigerate it because I have a hard enough time waiting the 12 hours needed!
  When you are ready to bake, grab your cutters and some extra flour and roll out that dough. If when you’re handling the dough it’s too sticky just mix in a bit of flour until it isn’t any more. As I mentioned, I don’t like thin crunchy sugar cookies, but I will let you determine which cookie thickness will make you the happiest.  Be strategic with your cutters, if you keep re folding left over dough back in you’re going to end up with really dry, puffy, cookies.  Bake at 350 on a nonstick cookie sheet for 8-10 minutes. I can’t tell you how many cookies this recipe yields. It depends on what size cutters you’re using and how many you eat before you bother to count them, but it’s a very generous recipe. You can easily fill your cookie jar.  If the cookies are golden on top you’ve baked them too long. I know mine are perfect when I pull them out and they are still a little soft but browned on the bottom. They will firm up a bit sitting on the cooling rack. (If you break a cookie pulling it off your cookie sheet you know you have to eat it right? That’s the rule. None of my Valentine octopus cookies made it to the frosting stage. Such a shame.)
 Most of the time I have to frost my cookies the next day (when you triple the batch it can take all day to bake) so I throw them in airtight containers once cooled until I am ready. I use two different methods to decorate these cookies. There’s always the butter frosting I used growing up (YUMMY) and a recently added royal icing (Pretty). Loads of people do not really like the flavor of royal icing, I do, but mostly I love using it sparingly for detailed decorating along with loads of sprinkles.  When you color either of these make sure you use the cake frosting coloring gel, and not food coloring drops. The drops can prevent the frosting from firming up.
Butter Frosting
2-2 ½ cups powdered sugar
½ stick of softened butter
2 tablespoons-ish  milk
1 tsp. vanilla
             Mix all this with a hand mixer.  The frosting is going to harden up sitting out in the open air, if you’re a slow "froster" just add a tiny bit more milk and mix again to save it.  Frost with a butter knife and smash on the sprinkles.
            If you want to add some details with Royal icing I always peek at Martha Stewart’s recipe 
(I add a bit of vanilla to mine and get the powdered meringue at Michael’s.  Make sure you print out one of their coupons.)

                   TA-DA! Now you’ve got your hands on some yummy little sugar cookies.  Mail them to Grandma, decorate them with your kids, eat them while watching Project Runway….I hope you’ll have fun making them. If you don’t, you’ve at least got cookies as a consolation prize!
                     -Kendra
               
P.S.- Did you like those eyeball sprinkles? I found them at target. Sometimes they find their way into the boy's lunchboxes on monster sandwiches. Yummy.