Showing posts with label project. Show all posts

Thursday, May 3, 2012

May the 4th be with you!

          Back in March the husband and I decided the boys were finally old enough to enjoy their very first Star Wars movie. Truthfully once they got a taste of it from the Lego version they were begging for more Droids and Jedi almost daily. Eric and I did have a minor squabble about which movie to start with... The Phantom Menace or A New Hope... but not to worry I set him straight and we started off right with Episode 4. At the end of the movie, and after Romyn asked why everyone was getting married, I congratulated him and Baelin on officially becoming big boys. (It certainly seemed like a major life event at the time.) Since then we have slowly worked our way to Revenge of the Sith, which we plan on watching on May the 4th...Star Wars Day!
       For the grand conclusion of our epic Star Wars journey I promised the boys popcorn, light-up lightsaber lollipops, Star Wars library books, and new Star Wars t-shirts. Of course, Baelin made it hard on me and begged for a R2D2 one. 
        ".....or C3P0, because they are my favorites.... if they don't have those we can get the silver C3P0, or the red Droid, or the black Droid. I love them all. I love Droids."
         Awww. Except, none of the Star Wars shirts at Target had ANY Droids on them. While mentally making a list of other stores I could search in, and moaning about  just how long that would take me, I spotted the multi packs of white Fruit of the Loom tees and decided painting my own would be a better waste of my evening. (I am gonna crack these out at warp speed!)
        Well two nights, some blue dye, leaky freezer paper, silver paint, the Force, and a Sharpie later the boys are thrilled to have exactly what they wanted. Mostly, Romyn was a little critical I did not fit all of R2 on the shirt. "I can't see any of his gadgets!" (Grumble.) At least they haven't watched the films enough  to lecture me about every detail I got wrong... yet.
                    May the 4th be with you and Happy Star Wars Day! -Kendra

Monday, April 23, 2012

Aztec inspired painted combat boots.

             This weekend was wet and chilly. It was nice to open up our windows, listen to the rain and snack on soup and crackers all day. It also would have been a good time to get caught up on some house work, and I had every intention of doing that! I put some play dough in front of the boys, reminded my husband he has to add water to that can of Campbell's tomato soup (honestly!) and started rearranging a closet. Except... then I found hubby's combat boot stash. (Belleville brand.) He's got a lot of them, and I thought to myself ... I'd wear a pair of these on a wet day like today. Maybe ... if they were polka dotted... or... tribal! Maybe I could commander a pair.
             I dangled a pair in front of his nose. "Hey... can I have these?"
             "Are you going to glitter them?"
             "Nooooo."
             "Then yes."
             Cleaning aborted!!!
                I offered to paint his work pair too... but he declined. Something about "regs" and all that. 
                It's rainy again today, the windows are open, and Baelin and I are enjoying the chilly weather  with hot coco while Romyn's stuck at school. Now I am going to attempt to finish the closet I started... you know... unless otherwise inspired.
                Happy Monday! -Kendra

Saturday, April 21, 2012

Crazy easy necklace to headband DIY- (and B.A.I.T. footwear's contest entry.)

          So.... do you have a favorite beaded necklace and ever dream that you could wear it in your hair? I do. I have a few actually, and yesterday I was messing around with them, wishing I could adjust their lengths and playing at wearing them as bohemian crowns. They didn't really stay put, and I didn't want to cut them up or hold them down with bobby pins, so I put them aside. BUT... last night, as I was falling asleep I had a genius idea, if I flipped them around a hair tie, I could wear them as a headband, or a shorter necklace, without any alterations to the necklace! Thank you lucid dreamer Kendra!
          This morning I searched the Internet high and low, thinking perhaps I'd seen this little trick before and just couldn't remember where in my dozy state. I didn't find anything like it. Really, it's so easy it's almost silly to show it off... but.... I am going to anyway! Summer is on the way.... we all need hippie beaded headbands.... and I am thinking this has got to be the easiest way to do it.
             WOW right!? It's so easy. Just grab a few different size rubber hair bands to see which might work best with the length of your necklace. Thread your necklace through the band until it's in the middle and then fold the necklace over. Then you'll be able to spread out your necklace into a circle, hopefully the perfect size to wear as a headband! Try mixing it up with more than one necklace, or if you're feeling fancy, use a ribbon instead of the hair band (or just add one) and you'll be able to tie a pretty bow as well.
           I'll say though, I am most looking forward to using this easy little trick as a quick way to shorten my longer beaded necklaces. Usually I just tie knots in them, or criss-cross it, but they always either come lose or slide around and choke me. (I am always readjusting them.) I'll get more wear out of them now I think.
           If I had figured this out yesterday I probably would've played around more with my entries this month in t B.A.I.T. footwear's "I Wear Pretty Shoes" style challenge. This month's shoe is the Ellie in teal (which are just so cute) and my beaded head band would have been really great with one of the outfits I sent in.... this one....
Ellie photo taken from B.A.I.T.'s facebook page.
                The rest of my entries were mostly shorts and tee's. I had to be honest, I would wear these little shoes with my everyday frumpy playground mom clothes. (Because they are cute and I love them, not because they are frumpy!) There's nothing like a cute shoe to dress up a Jem t-shirt right? Well I hope you all entered this month... if not, do it next month! If you haven't checked out the rules yet take a peek at B.A.I.T.'s blog now! It's lots of fun and a good excuse to dig in your closet.
                 Have a great weekend! - Kendra
                

Friday, April 6, 2012

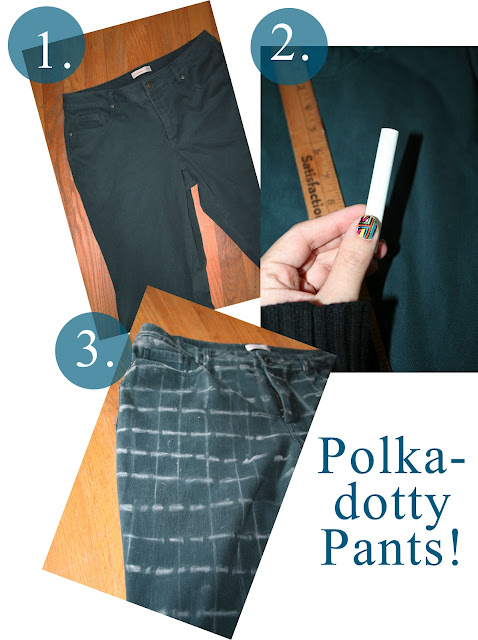
Bleached Polkadot Pants, an easy DIY.

          I should just warn you all that I am on a bit of a dye and bleach binge at the moment. Nothing in my closet is safe! (From my projects, or the unintentional splatter from the process.) I saw this Polka-dot jean D.I.Y over at johansson life in rewind and thought I'd like to try my own version with bleach instead of paint. My dots are not at all perfect, but I still really love how fun these turned out! Don't forget, when working with bleach you have to work fast, or you'll end up with little holes and not cute dots.
1. I grabbed up some teal pants I found at the thrift shop. You could use jeans or colorful shorts, so long as they are mostly cotton there should be no problem bleaching them out.
2. Grab some chalk and a yard stick, if you want your polka dots to be somewhat uniform it is a good idea to mark out a grid, or map out your dots with some chalk or a washable marker. If you want something crazier you could always test your design out in chalk first, maybe try zigzags, stars, lyrics from your favorite song, "I love polka dots", you know, whatever.
3. Once you've stuffed the legs with paper bags or cardboard to avoid your dots bleeding through, grab a bunch of q-tips and a cup of bleach and head outside. Remember, work quick, I worked from the bottom left to right and up the front, putting dots at each intersection in my grid pattern. I then flipped the jeans over, and did the same on the back. Back on front I added more dots in the center of the grids (work bottom to top again), and repeated onto the back. The pants need to go into the wash quickly to stop the bleaching process.
       You can't tell by the pictures, but because the second set of dots  had less time to set, they are a lighter pinky color, where as the first set is pretty much white. I love that I was able to get this effect. If I did this project again I might water down the bleach a bit, so I don't feel like I have to rush through it so quickly. (The more watered down your bleach is, the longer it will take to fade your fabric.)
            Of course my #1 tip is to add tacky holiday pins to make your new polka dotty outfit even more fabulous! I was lucky enough to find an instant Easter collection at my favorite thirft shop this week. Hurray!
Too cute!
Happy Friday Everyone! - Kendra

Thursday, April 5, 2012

Easy Galaxy Jeans D.I.Y

  To boldly go where no jeans have gone before!
      Galaxy print is awesome. I love it! Sadly, shopping around for it I haven't had any luck finding something in my size, or really within my budget. (Also, I don't do leggings.) There are a few Galaxy print D.I.Ys you can find online, but most of them are for bleached tees, or painted leggings or jeans. I personally thought that a bleach and tie-dye combo would give me the look I wanted, and thought I would try it out. Here is my first attempt.
 After twist tying a few "galaxies" into my jeans I used a paint brush to apply pure bleach. (In the future I will water it down.)  I very quickly cut them free and added some bleach splatters, swirls and star shapes with a smaller brush. (Front and back.) Next the jeans went into the washing machine.
 Once washed I followed the directions on a pack of purple fabric dye. The package warned me that it  may not take to bleached areas, but I didn't have a problem. To give the jeans a spacey, ombre, look I soaked the leg bottoms in the dye a few hours longer then the rest.
  I also tried out a salt resist technique over the dye, which should have added a neat "bloom" finish, but despite letting it sit over night it didn't seem to take. (Or maybe it did, but I can't see the results through the grain of the denim?) I'll skip that trick on the next pair. So after letting the dye set over night, the jeans went back through the washer and dryer, and received another splattering, swirling, and painting on of bleached stars. Again, work fast, then pop right back into the washing machine. I am afraid this project wastes a lot of water. Sorry! But look at those great results!  
JEEEEEANS IIIIIIIN SPPPPPPACE!

 
That's it! It's as easy as tie-dying!  I wore them over to visit my parents last weekend and I tried to show them off to my Mom.
"See.... I splattered on stars... and added a swirl for like a galaxy, then I painted this little star burst...."
"So you tie-dyed them."
"No Mom... I galaxy dyed them. Don't you get it? It's a galaxy."
"Just because you put the word galaxy in front of it doesn't make it something new! I was GAAAALAAAAXY dying jeans before you were born!"
"Soooo.... you don't think these look like space? Should I bedazzle them too?'
"Now you're thinking."

Yes.... I am. They could use a little extra sparkle don't you think? - Kendra

Wednesday, March 21, 2012

A touch of paint....

                  Thrift shopping this week I picked up a few items which will be needing a bit of work. We're talking color... like paint... loads of paint.  I love having a project to keep me busy, but I am afraid my new thrifted finds are going to have to wait a bit. I've got a few skirts I'm going to work on, a doll to craft for a baby shower, and a lot of spring cleaning to catch up on first. (Not just a lot.....but a LOT of spring cleaning.) Putting off projects doesn't make me very happy, but at least it will give me time to contemplate colors and patterns, and I've put off vacuuming behind the couch long enough. While I was thinking ahead to those future projects, I thought I would show you some that I worked on last summer.... please take a peek!
                I know it might break some of your hearts to see me repainting cute vintage finds.... but.... truly, Mr. Owl told me he is soooo much happier now that he's all fancied up! Excuse the cell phone pictures.... originally the flower wall hanging was simply metal, but I am again caught without a true before photo. (You trust me it's much better now right? Gunmetal flowers are not delightful!)
                Does anyone else love to repaint? Furniture, ugly owls, velvet wall art? When I shop second hand I'm always thinking how I can give my buys a new look, be it by brush, spray paint, or glitter. Ooooh, I just love makeovers!
               I'll have more, newer, repainted goodness coming soon, and I hope you'll be inspired to pull your own paint brushes out too! Till next time- Kendra

Monday, March 12, 2012

What I wore to the museum.... a refashioned Moo moo!


Sunday the boys and I visited the Virginia Living Museum for their "What is it?" event. The museum invited the public to bring in their nature finds, like feathers, stones, bugs or fossils, to be examined and discussed by the experts. Being a bit of an amateur fossil hunter and wanna-be-artifact finder I could not wait to bring in my stash. (I literally have a picnic basket full of rocks and treasures in my bedroom!) Well, I’ll tell you how enlightening our trip to the VLM was later, right now I just want to brag about my skirt! (You must forgive the two cell phone pics, this skirt was a pre-blog project, so I am just glad to have “before” pictures at all.)

Many moons ago while digging in the sale rack at my favorite thrift store I came across this green moo moo dress. I instantly fell in love with the bright green color and vintage ribbon stripes. In L-O-V-E!! I knew I had to have this dress in my life, just… not as a moo moo. Hoping I could easily turn it into a skirt, I paid a dollar for it and worked up the courage to cut it up. I am no seamstress, my mother says I am too impatient to sew anything correctly, and she is right. Patterns freak me out, and I normally do just fine without them. …..however, usually I am making dolls, or bunting, a cat costume or tote bags…. never anything that I’ve expected to keep my tush covered while in public. (That’s not true, I did sew a crazy patch work denim skirt in high school, and it was a mess!) Truthfully this was much easier than I thought it would be, I just chopped it above the pockets, folded the top down and sewed in a new elastic waist band with the machine. Because I didn’t take the skirt in at all I had to add a few stitches into the elastic at the pockets and the seam to keep everything in place. (I am sure you sewers out there are cringing at the way I hacked it all together- I was just glad it only took about an hour and a half, and then I got to watch some trashy TV.)
Originally the length of the skirt was determined by the pocket location. I didn’t want to have to move them down, so I just made the waist right above them. (Gotta love a skirt with pockets right?) Yet, after wearing it around a bit, I decided I wanted it a little shorter, so I took off a few inches from the bottom. Looking at that “before” picture up there though- I sort of wish I had left it.... it looked great right? Well, I still adore it anyway. The colors are perfect for spring and it gets me loads of compliments. (And not the “only you could wear that” sort either!)  I had such a good experience refashioning that tired old dress into this trendy skirt that I’ve been encouraged to do it again.  There is actually a basket in my closet filling up with vintage maternity dresses and more moo moos. I'd love to try and do the next set properly, with measurements and maybe even zippers, but, eh.... who am I kidding? Elastic waistbands are this girl’s best friend. It’s the quickest, and I have Girl Scout cookie pudge to deal with after all! (Nom-Nom!)
             Ha! Looking at these pictures I've realized that I was having so much fun this weekend with my rocks that I forgot to get my bangs cut. Well... I'll have to get to that tomorrow. (And don't forget to like Happy Words and Things on Facebook for a chance to win a Happy Prize Package. Good Luck!)
:-) -Kendra


Sunday, March 11, 2012

Cat shoes and the joys of hot glue.

Baelin is a unique boy who loves cats. Loving cats doesn’t make him unique, but perhaps the fact that he doesn’t mind that cat themed merchandise is mostly pink does. If it has a cat, he has to have it. He’ll happily stomp around in a superman raincoat and pink kitten boots any day. Now Baelin doesn’t seem to mind all the pink and purple, but, he is a green loving, fighter jet chasing, monster truck crashing, kitty loving, four year old boy’s boy and I just don’t know how much longer he’ll tolerate all this sparkle with his kittens. Honestly finding anything “catty” that’s not purple glitter or tie-dye feels like winning the lottery. Not wanting to see his love of all things feline eventually discouraged, whenever I can cat-customize something more to his tastes, I do.   
                I found these green slide on shoes this week at Kmart for $7.99- a bargain! Inspired to refashion them I whipped out my stash of felt and spent thirty minutes transforming them into cat shoes. I am pretty keen on felt and hot glue, and do not mind one bit spending an afternoon customizing t-shirts or tote bags for the family. Sometimes I’ll use the sewing machine, I wouldn’t say I can sew though, but I can “craft” with the thing. The instant gratification that hot glue rewards me with however usually wins out over sewing. (It’s just so darn quick and easy!) Romyn of course needed new shoes too, and requested that his showcase blue dogs. He wanted his upside down so they would always be looking up at him. (Yes, they look a bit like rabbits, but they're hanging upside down! And Ro doesn't seem to mind.)

                I’ve included photos of a few other articles I have recently tortured with my glue gun. The totes are from the L.L.Bean Outlet store, they were personalized and then rejected. After gluing some characters over the monograms they are now perfect for lugging supplies to school or toys to the park. Unique totes make my unique boys happy. And unique “granny style” thrifted purses make me happy. I just stitched on some pom-poms and glued on a happy little cloud for an instant cuteness upgrade!  Anyone can win with hot glue!
Happy Crafting Everyone- Kendra

Tuesday, February 28, 2012

While out walking my jackalope....

(Sigh) I am such a mess. Basically, the family has had a lot going on which has delayed Happy Words from getting some flocked shoe outfit photos. We're all getting over some bugs, Eric (the hubby) has been studying for his Master Sargent placement test, the weather has been bad, and we were temporarily distracted by Legos. So when we finally had a sunny day I knew I had to catch up and cram a few shots in before I was once again preoccupied with life stuff. I had a quick plan, figuring we’d take the kids to the park, where there’s a big bathroom I could change in (getting a few outfits in all at once), I’d pack a picnic, walk the trails, and we’d all have a nice time.
I remembered to hastily grab all the “important stuff” like a ball for the boys, the camera, flocky shoes, the dog, some lunch, and my tights. I had not planned out any outfit accessories though. Standing in my bedroom with a tote in hand and the kids shrieking out their pre-park excitement, I figured I’d just grab a bunch of gold and brown stuff and sort out exactly what I wanted to wear once there. (What a bad idea!)
Now I guess it was the rushing out the door that threw me … because I KNOW how I am when dressing up. When I pack for trips, I make sure I have lots of options. I personally have to see it all on, in front of the mirror, and by the time I am done mixing and matching, trying out every bracelet and necklace, it looks like a tornado has ripped through my room. By using this tried and true method I don’t end up all matchy! If I had stood in front of a mirror wearing all of this, I would have said…  I need my orange bangle and hobo bag. Yah…. it would have been much more fun that way and broken up all that….. brown. (And been more true to me.) Actually I did say all that standing in front of a mirror, but the mirror in that cold park bathroom was kinda far from my closet. I also might have tried on a few other tights, it’s not like I have any shortage of those…. green, yellow, anything! But instead I got out there, realized my gold belt was too big, (Hence why it is backwards in that one picture. Three cheers for weight loss!) and that none of the accessories I grabbed actually worked together. I guess I just reeeeeeally wanted to show off my FAVORITE vintage bag so I could tell you all how I fought dirty for it at an auction and WON! (Doesn’t matter that it doesn’t work with the hat!)  Anyway, I almost scrapped all of these photos, because it’s not exactly how I would have worn it out, if I had gotten dressed in my house, and not in a public park bathroom. It’s almost me, but not quite me. But you know what is soooooo me? Messing up and learning lessons about getting dressed in the woods.
So here we are. You know where..... playing dress up in a public park bathroom. It's really the best place for styling and fashion reflection. It’s where you wonder, why I didn’t grab that other clutch. It’s where you promise yourself, that the next time you do an outfit post you’ll actually wear it to the photo location, even if it means you only get to take pictures of one outfit. (Wonder if I could teach my three year old fashion photography?) And it’s when, after your five year old shouts from a crowded playground “HEY MOM! Are you going to change your UNDERWEAR too!?” you decide you might need a better way to wrangle the children during these experiences. Perhaps the best way to deal is to send them to school, and kidnap one of my girlfriends to play dress up in the woods with me instead! No worries. I’ll figure it out. Until then, look at my amazing vintage purse!
(And check out those Jackalope earrings that Eric got me for Valentines! The Etsy shop they came from, Fable and Fury, is full of many potential gifts he should think about getting me!)
At least messing up is still fun! -Kendra

(A better picture of the jackalope earrings from the Fable and Fury store.)